Step 1: Manage Azure Subscriptions in Release or Build definitions
Click Manage in the Azure subscription. And it is redirected to the service connection tab.

Step 2: Add a new Service Endpoint to VSTS Account
Click New Service connection to Add new connection and pop up below dialog. If the Azure subscription you want to use is not automatically visible to VSTS, then you will have to configure the connection. This is done manually using the advanced settings. Near the bottom of the dialog, click the link in the instructions that says “use the full version of the endpoint dialog”

Pop up below dialog and we need to fill the details to configure.

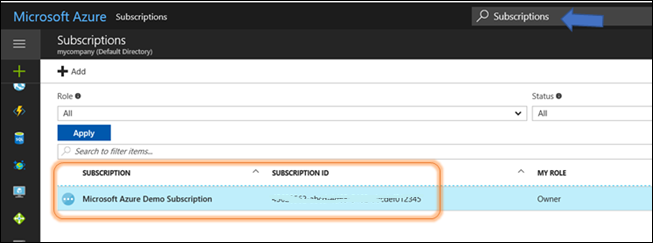
Step 3: Log In to Azure Portal to get the Subscription ID and Subscription Name
Go to the Subscriptions blade (Search Resources feature found at the top of each page in the Azure portal.) the values you need will be displayed on the screen. Copy these two values to the dialog.
Step 4: Get the Tenant ID in Azure Active Directory blade
Go to the Azure Active Directory blade. Open the Properties menu blade. Copy the Directory ID field to the Tenant ID. The Tenant ID is a reference to the Azure Active Directory (AAD) instance within the subscription.

Step 5: Get the Service Principal Client ID in Azure Active Directory blade
Go to the App Registrations menu blade and select New application registration. In the Create dialog, give the application a friendly name, such as VSTS Connection. Use the default Application Type (Web app/API). The sign-on URL must be unique but otherwise can have any value. After you have created the application, the Properties menu for the new application will show you the Application ID. Copy the value from Application ID to the Service Principal Client ID field.


Step 6: Get the Service Principal Key in Azure Active Directory blade
Click
the Setting newly created application as below

Open the Keys menu in your newly created
application. In the empty field, type a descriptive name for the key you are
wanting to create. Set the expiration time for an appropriate amount of time.
Press Save to commit your changes. The application’s key is displayed. Copy
this value to Service
Principal Key.

Step 6: Giving the application permissions on Azure
in the Subscription blade.
Go to the Subscription blade and select the
targeted subscription. Within that blade, open the Access control (IAM) menu. Click Add to grant our application permission. Choose the Contributor role. Under select, type
the name of the application that you created. Once it appears, click the
application to mark it as selected. Then, press Save to confirm your changes
and confirm the updated permissions.

Step 7: Return to VSTS and test your connection.
At this point, the Service Endpoint should
verify and show as able to connect. refresh the subscription drop down. You
will see your Azure subscription is now available.